Quick Start
Before diving into the theory and concepts of how everything works, let’s jump straight into action. Use this simple code to turn on the onboard LED of the Pico2.
We’ll use Embassy, a Rust framework built for microcontrollers like the Raspberry Pi Pico 2. Embassy lets you write async code that can handle multiple tasks at the same time; like blinking an LED while reading a button press, without getting stuck waiting for one task to finish before starting another.
The following code creates a blinking effect by switching the pin’s output between high (on) and low (off) states. As we mentioned in the pinout section, the Pico 2 has its onboard LED connected to GPIO pin 25. In this program, we configure that pin as an Output pin (we configure a pin as Output whenever we want to control something like turning LEDs on/off, driving motors, or sending signals to other devices) with a low (off) initial state.
The code snippet
We’re looking at just the main function code here. There are other initialization steps and imports required to make this work. We’ll explore these in depth in the next chapter to understand what they do and why they’re needed. For now, our focus is just to see something working in action. You can clone the quick start project I created and run it to get started immediately.
Important
This code is incompatible with the Pico 2 W variant. On the Pico 2 W, GPIO25 is dedicated to controlling the wireless interface, we will need to follow a different procedure to control the onboard LED.
#[embassy_executor::main]
async fn main(_spawner: Spawner) {
    let p = embassy_rp::init(Default::default());

    // The onboard LED is actually connected to pin 25
    let mut led = Output::new(p.PIN_25, Level::Low);

    loop {
        led.set_high(); // Turn on the LED
        Timer::after_millis(500).await;

        led.set_low(); // Turn off the LED
        Timer::after_millis(500).await;
    }
}
Clone the Quick start project
git clone https://github.com/ImplFerris/pico2-quick
cd pico2-quick
How to Run?
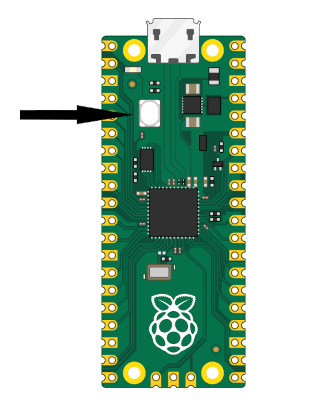
To Flash your application onto the Pico 2, press and hold the BOOTSEL button. While holding it, connect the Pico 2 to your computer using a micro USB cable. You can release the button once the USB is plugged in.
# Run the program
cargo run
This will flash (write) our program into the Pico 2’s memory and run it automatically. If successful, you should see the onboard LED blinking at regular intervals. If you encounter any errors, verify that you have set up your development environment correctly and connected the Pico properly. If you’re still unable to resolve the issue, please raise a GitHub issue with details so I can update and improve this guide.
With Debug Probe
If you’re using a debug probe, you don’t need to press the BOOTSEL button. You can just run cargo flash or cargo embed instead. These commands are covered in detail later in the book, though you can jump ahead to the Debug Probe chapter if you’d like to explore them now.